Saturday, August 27, 2011

Gargoyle

     Found some old pics of a gargoyle I did years ago for confrontation. I'm not sure which brand of paint I used at the time but it looks to be pretty straight forward in style.
     Base coat then wash then drybrush. I do remember trying to add a "magic like" effect with the green where he is coming out of the pillar. Never did finish this guy, didn't even start to base him yet. Oh and his wing broke off and was re-glued on explaining the gap between body and wing. Anyway, I posted this picture because I am excited that someone picked up the license to make Rackham models again. What a fantastic line they used to have.
     When I was getting into confrontation I collected up a fair amount of undead of Acheron and alchemists of dirz models. I drifted out of the hobby for a bit and when I came back to it I was surprised to hear that rackham went out of business. I thought at the time they had one of the best product lines out there. As it turns out they switched from pewter models to plastic pre-painted models. WOW. How could you do that rackham? Anyway, I'm sure they had their reasons, too bad it didn't work out for them. To the new owners of their back catalog; start pumping out some models! That company would be Legacy Miniatures by the way. I applaud you. 22H2YFJ6X7CP

Paladin

A paladin to lead my men at arms regiment. I started this guy by positioning him in the unit he will be leading to see if I may need to bend or alter his stance. Turns out I did need to do something as he was hitting the guy
Photobucket
 behind him in the head with his hammer. As you can see from the miniature bending would look bad so I raised him up and put him at an angle so his hammer clears the man behind him. I sprayed him with white primer and got down to business. I picked white and blue as his main colors so that he would match the men at arms unit he is leading. This means that they are his troops brought to the battle from his domain. I also figured that being a foot regiment these guys would be a sort of engineer corps in my bretonnian army, so I chose the castle as his personal heraldry. The blue I used is model color prussian blue, I like this color a lot, it has a nice even finish and doesn't have a problem going over other colors. The tunic was based with model color sky grey and dirtied up with citadel badab black, then highlighted back up a bit with sky grey and citadel skull white. I wanted it to look a bit dingy, since he fights on foot with men at arms. The armor was done with vallejo liquid silver, washed badab black then highlighted with citadel mithril silver. The helmet was done with vallejo liquid green gold then washed badab blacks and highlighted with citadel burnished gold. His warhammer was done with citadel boltgun metal and washed badab black. For his base I've incorporated some static grass along with model train grass that I think makes good moss type stuff. Overall I like the way it turned out, I wish I had highlighted the gold a little bit more but he stands tall over his man at arms which looks pretty commanding.
And some troops.
Photobucket
Photobucket
Some close-ups.

Photobucket
Photobucket
The men at arms were done with a wide variety of color schemes from dark greens to black to various browns and tans. I wanted them to look like they had a collection of old military uniforms perhaps passed down from older generations. To tie them together as a cohesive unit though I made all of their neck wear prussian blue and of course their shields have all the same heraldry. These guys were very quick to paint using mostly basic techniques to get a tabletop quality finish. All colors were base coated, then washed, then touched up/ highlighted. Real simple. For the bases I wanted a lush green heartland of bretonnia look so I went with my usual model color US tan earth as a base then added a layer of model train grass in a thick amount on top. After that I put a heavy amount of citadel scorched grass to finish it off. When these guys are based side by side on my movement tray it looks like one solid lush green strip of grass. This is also the point when I started magnetizing my bases and building unique movement trays for each unit. Sadly the tray I made these guys only holds a 20 man unit, I have since decided to add 30 more men to this unit. So that tray will likely get very little use. 8th edition warhammer is no place for small units. 

Zombie Dragon conversion

This zombie dragon was entered in the golden bat 2011 conversion contest hosted by carpe noctem and sponsored by mantic games. It took 3rd place.
Here are the pieces used. I had an old kit of a zombie dragon from the 90's that I never did anything with so that made the perfect starting piece. Given the size of todays models I knew right away that this zombie dragon was in need of an upgrade. I wanted a longer neck and tail, so greenstuffing was going to be part of it, and according to the competition I was going to need to do a lot of altering/sculpting to qualify. I picked up some broken coaster bits for the base, I was thinking of having him clinging to the side of a cliff or rocky outcropping. A rider was a must as in the actual game of warhammer you can't just take a zombie dragon by itself and I wanted a model that I can actually use in a game. I found some jeweler chain in my bits box that would make suitable reins. I went with the old red duke vampire model for the rider, since he is kinda rearing back and has a flowing cape behind him, his left arm is also positioned well to look like he has reins bunched up in his hand. For the wire frame I wanted something strong that I could bend into the shape I wanted and have it stay that way, I looked into a lot of different wire type things (copper electrical wire, clothes hanger etc.). I settled on a piece of wire clipped from a whisk from the kitchen. It matched my criteria; strong but just flexible enough to get the shape I wanted, and it just happened to be the same diameter as the largest bit in my hand drill.
Photobucket
Work in progress. Here you can see I've pinned the wire frame for the neck and tail and positioned the body to be climbing up one side of the rocky outcropping. The meat of the tail has been sculpted as well as a few of the larger scales on the ridge. I decided to put a casualty on the base at this point and found a perfect model for it in my bits box. I was some (reaper I think) monk model that would make a convincing barbarian if lying face down. I ripped one of his arms off and greenstuffed a bit of guts and gore coming out of his underside. I put and old bow in his hand and and arrow in the other with a quiver not too far off. I then added three arrows the the zombie dragons torso. The arrows are in a pretty tight shot group, heh the barbarian was a good shot but not smart enough to realize shooting a zombie in the heart has no effect.
Photobucket
On this side you can see where the dragon is gripping onto the side of the rocks, I really like the way the position turned out, I was able to fill in under his left front claw with small bits of cork and then fill in between all of his toes with balast that a friend gave me to use as sand. All of his claws are now seamless on the rocks.
Photobucket
Some finished pre-paint shots. Here the zombie dragon conversion is done. The neck and tail were finished, the end of the tail was popped on and the scales were all added. I did the scales by rolling greenstuff into a long strand and taking a tiny piece of it at a time, rolling it into a ball and pressing it on with a sculpting tool. It took forever but I think it was worth it.
Photobucket
Photobucket
Here are a couple shots with the rider attached. Adding the rider was pretty easy since the red duke miniature was already positioned the way I wanted it to be. I just greenstuffed a strap to his hand and glued the chain to the zombie dragons head. The cape was slightly bent upward to give more motion to the model. 
Photobucket
Photobucket
And a shot after some primer. Here is where the model is at currently. I removed the rider and chain for painting but now I may make some changes. The guys on carpe noctem have given a couple of suggestions that I think I must do. First is to get rid of the jeweler chain in favor of a regular looking chain. Makes sense why would this guy have a giant necklace to hold his dragon with? The other thing is the wing size, after the neck and tail enlargement the wings are starting to look pretty small. Not to mention games workshop just released a new zombie dragon model with gigantic wings. This thing will look a little small next to it. I'm open for any suggestions on how to make the wings bigger. I'm thinking maybe extend them with cardstock or something similar. Or perhaps finding new wings altogether.
Photobucket
That's where it's at right now. Sadly no paint yet.

Wolves

My direwolves and doomwolf. I still need to get better pics of these.
Photobucket
Photobucket
So I painted these guys years ago but never finished them. The paint job itself was real simple, black, grey, white, bone, and a little purple. I started using some extra broken bits of cork coasters to make rocks on the bases, sadly I only put one on this unit. I went with all dead grass on these guys but later decided to add tufts of scorched grass to create some more depth and to hopefully match the vargulf a little better. One of the best ways to tie an army together theme wise I think is giving the bases a unified look. So after a little altering they should match a bit more.

Skeletons

Here are the skeletons I've been working on. A musician followed by 20 rank and file. No standard bearer yet but hopefully soon. Painting process posted at the bottom.
Photobucket
Photobucket
Photobucket
Photobucket
Photobucket
The bone was done with a base of game color bonewhite, then washed with citadel gryphonne sepia, after drying I washed again with citadel badab black. I then drybrushed with more bonewhite. Citadel black ink was used to deepen some eye sockets and joints. The armor was made from a collection of bits from old 4th edition skeleton sets from games workshop, and a lot of greenstuff. The armor was base coated with citadel chainmail then washed with badab black. After drying I drybrushed back up with chainmail then put a light highlight of citadel mithril silver. For the wood I started with a base coat of model color mahogany brown, then washed with citadel devlan mud and badab black. The shield bosses were based with citadel chaos black and lightly drybrushed with citadel skull white. The red parts were done with citadel red gore then washed with badab black. I started their bases by painting on model color US tan earth in a couple coats since they get handled quite a bit. I then mixed up some elmers glue and water about 50/50 and spread it out across the top of the base and then dipped it in some basing sand. While the base glue was still wet I sprinkled some citadel dead grass then a smaller amount of scorched grass. For the finish I sprayed them down first with krylon gloss acrylic coating, after drying I sprayed some krylon matte finish. And that's it, quick simple and looks pretty nice. These models rank up pretty well but it takes careful planning on which one to put where. If I was to start over I would pay more attention to how they will rank up after finished. I have about 40 more of these guys put together waiting to be painted.

My Vampire counts so far...

Well there's no better way to start than to simply jump right in. I'm going to show what I have completed so far on my Vampire counts army. I've been collecting this army since the mid 90's, it all started with warhammer: undead. Since the split of the undead army I've focused on collecting the Vampire side of things. My collection spans many editions of rule changes and updated sculpts, feel free to ask about a mini if you see something you don't recognize.
Here is my vampire lord. 
Photobucket
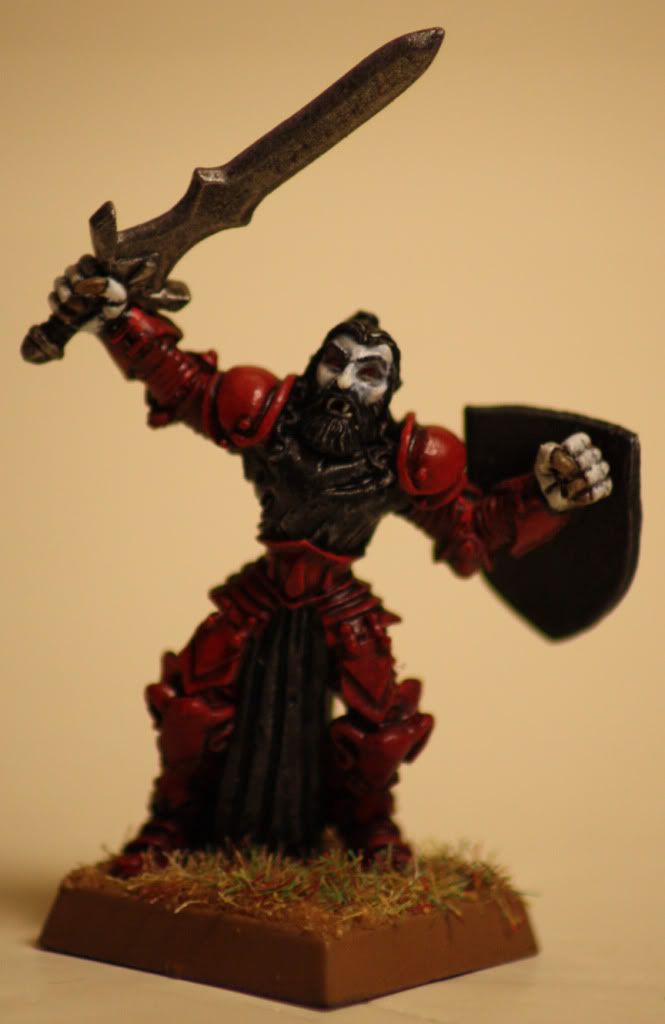
 The red parts were done with many, many layers of citadel red gore, washed with black ink and highlighted back up with more red gore and citadel blood red. The sword was done with a base coat of citadel boltgun metal and washed with citadel badab black then highlighted with citadel mithril silver. For the skin I started with citadel skull white then washed with blue ink. I decided to try and highlight up with a light grey that I mixed up with citadel chaos black and skull white. It turned out a bit dark so I then highlighted up with some more skull white. The black parts are based with citadel chaos black and highlighted with model color black grey and a very lights brush of skull white. For basing I started with model color US tan earth then spread some elmers glue and water mixture (50/50) across the top. I dipped the base in sand and sprinkled some static grass on it (citadel dead grass and scorched grass).


A vampire thrall.
Photobucket
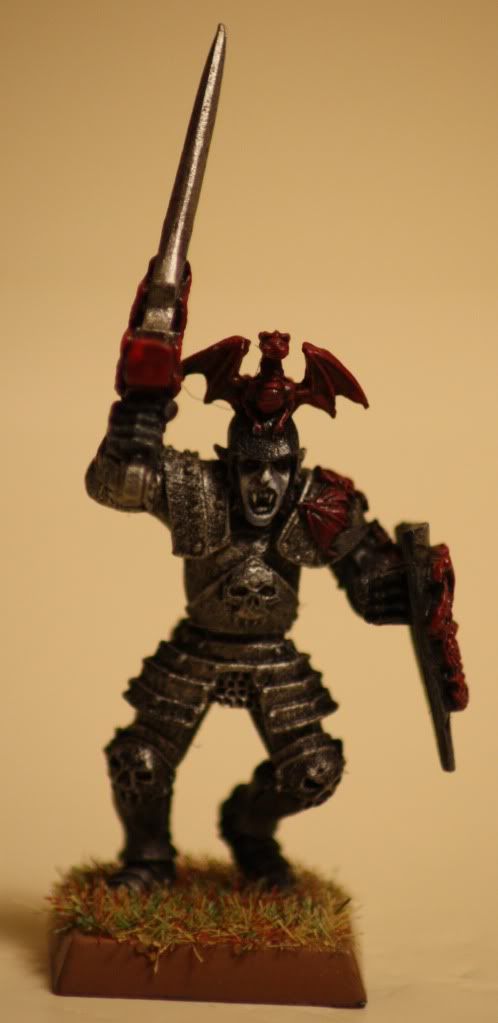
 This guy was real simple to paint, I was going for a tabletop quality when I started him as I just wanted to finish it up quickly. I decided to use black primer on this one to speed up the process. It also gave the armor a darker more battered look that I decided to keep. He was supposed to be a front line fighter so the more battle hardened the better. Instead of base coating the armor with a metallic I started drybrushing the black primer until it got to the point shown in the picture. I touched it with a light drybrush of citadel mithril silver to give a bit more depth then called it done. The skin was a mixture of white washed with blue ink then highlighted grey and then highlighted white similar to my vampire lord above. The red was also done in similar fashion to the vampire lord however, I used way less coats and it shows. The red I was using was citadel red gore which I bought in the late 90's. This particular paint has little pigment, when painting over darker colors it can be difficult to get an even look. I was not to concerned though as I think it adds to the battle worn look.


Wraiths and a banshee.
Photobucket
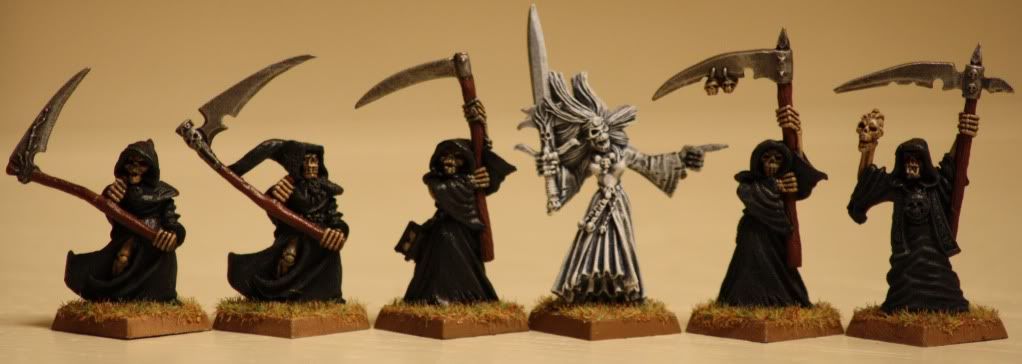
 These guys were a blast to paint, like most of my miniatures I've had them for many years and when it comes time to paint them it can be very satisfying. The method I've started using for all bone is this: white primer (any brand), base coat game color bonewhite, wash with citadel gryphonne sepia, let dry and wash with citadel badab black, let dry again and drybrush with bonewhite. Optionally I go back and ink eyesockets and joints if the badab black didn't do a good enough job. That's it, quick and simple and I think it has a pretty nice look.
I wanted these guys to look somewhat substantial rather than completely ethereal so I went with a color scheme instead of monochrome. The scythes were based with citadel boltgun metal and model color mahogany brown, both parts were respectively washed with badab black and citadel devlan mud. The blades were then highlighted with citadel mithril silver. The robes were based with citadel chaos black and drybrushed with model color black grey. I didn't want to pick out different parts on the body of the mini (like necklaces, scarfs etc.) to keep a dark looming feel. I painted one of these guys before with all the extra bits done and he turned out to look like he escaped the circus. So he met with the pine sol. I will note however the hourglass, I felt that it would be a nice extra to highlight. If these guys are coming for you then your time is up sort of thing.
Spirit hosts.
Photobucket
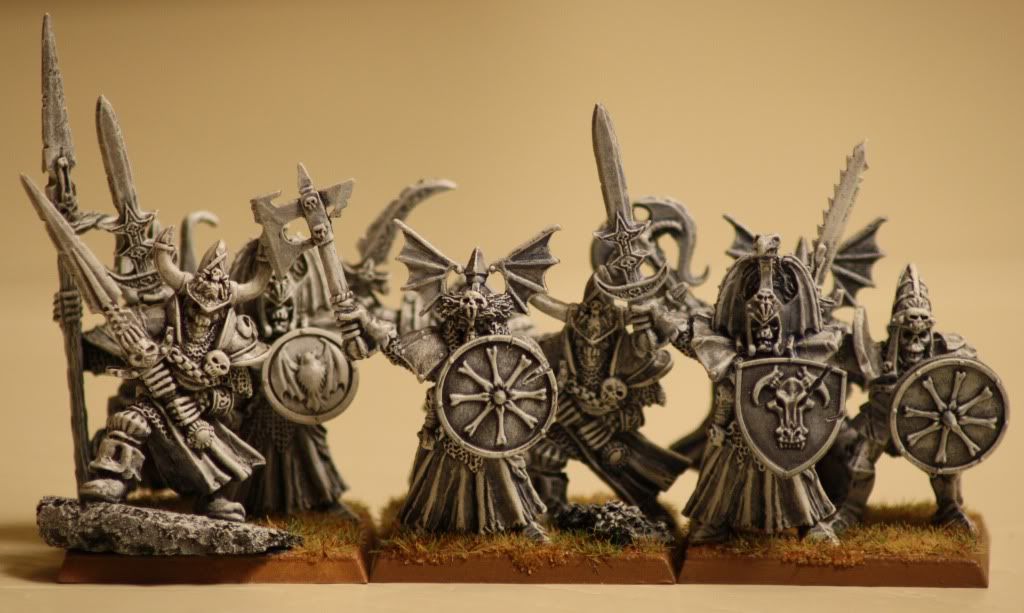
 These guys along with the banshee up top were painted using white primer. I based them with skull white then washed them with a heavy amount of badab black. I then inked them with blue ink and proceeded to drybrush up with model color sky grey. Finally I highlighted them with more skull white. As for the choice in model I decided to put to use some old 4th edition warhammer undead wights. I will be using them as spirit hosts, it makes me happy to be able to "recycle" my old minis into the newer rules sets.
The varghulf that got me back into the hobby.
Photobucket
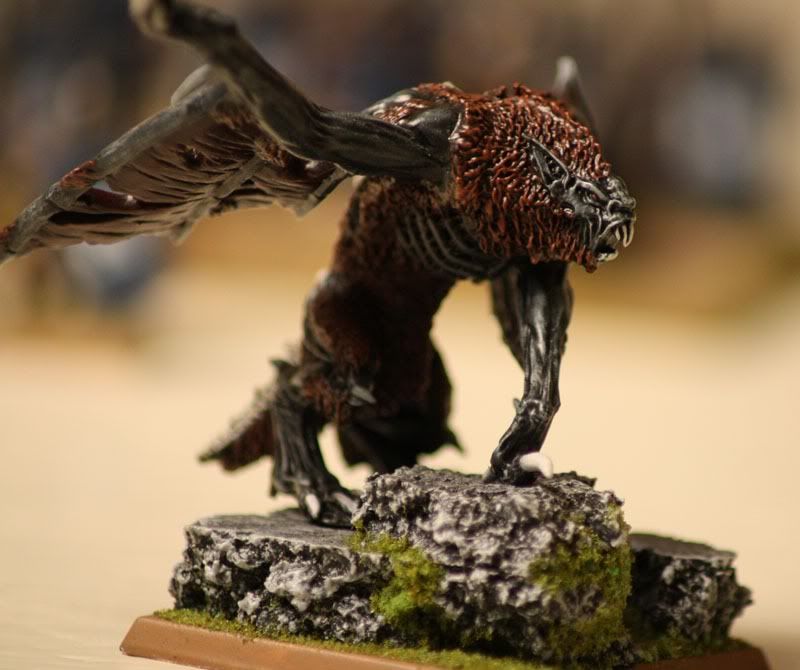
And here is the beast himself. I've been out of the hobby for years, one day I asked a friend to go with me to the games workshop store in our area. There were many new things to look at but this one just looked the best at the time so I picked it up. When I got home I dug through my boxes and pulled my modeling tools out and started to assemble. It was kind of a rush having it all come back to me, shave flash off, dryfit, go buy glue, drill pins, see if my 10 year old can of primer still has anything left in it... I had decided that I wanted to do a special base too, since I'd never done one before (always just painted one solid color with maybe some flock on it). It was a week long process and I am very happy with the way it turned out. It was my inspiration to get back into something that I love to do and will always be that turning point for me. The model was primed white and based with black grey and mahogany brown. I used a very watered down chaos black as an ink to wash over the entire mini. I highlighted the skin up with sky grey and the fur with more mahogany brown. The wings were first done with black grey to cover the white from the primer then covered with model color dark red. After that I used a heavy amount of watered down chaos black to wash it. For the base I broke up a cork pan coaster from the kitchen and positioned two layers so that the varghulf could appear to be climbing up the rocks rather than sitting forward in a football position (see original model). I bent his arms a bit to fit the position and bent his back left leg claws down to grip the edge of the rock. The rocks were based with black grey then highlighted up with sky grey and skull white. I picked up some "grass" from an art store that sold miniature train supplies and used it more like moss growing up in the crevasses and side of the rocks. At the time I was very excited to finish this guy, I sprayed a coat of gloss followed by a coat of matte finish on him and called it done. If I had any regrets it would be the fingernails, they are too clean in my opinion but hey it's not that bad. More to come...

First contact

Hello and welcome to my blog,

This is my first attempt at blogging so hopefully there will be lots of improvements over the next few weeks as far as layout is concerned. I'll be posting up a fair amount of photos, trying to keep them organized may be a challenge, but hey we shall see. Guess I should talk about what I plan on blogging. I've been collecting miniatures for many years and modeling/painting is a hobby of mine that I would like to share. I've read many hobby blogs and always gain some inspiration from them. I'm not the fastest or most skilled painter by any stretch of the imagination, but I think I have enough stuff that I can start a fairly regular blog.